
Having control over your irrigation, whether it’s for commercial or residential use, is an important step for any gardener.
We’ve put together a step-by-step guide showing you how to wire a K-Rain Solenoid Valve and Master Valve to our new WX8 Wi-Fi Irrigation Controller.
Watch our new “Three Minute Thursdays” video guide, or read through the steps below.
What is a Master Valve?
A Master Valve works like a back-up valve. When your controller signals a solenoid to open, it also opens the master valve at the same time. When no valves are operating, the master valve will shut off the water to your irrigation system. By shutting off the master valve the systems’ pipework is not under pressure.
1. Attaching the Master Valve
Screw your Master Valve to the top end of the manifold making sure you have the valve facing the right direction. K-Rain Solenoid Valves have an arrow to indicate which way the water should flow through.


2. Attaching the Solenoid Valve
Do the same with the Solenoid Valve, in this demonstration we needed 25mm nipple to connect the solenoid to the manifold.
3. Connecting the Active Wire
Once your two valves are secure, separate the two cables on your Master Valve. Choose one wire to be the ‘active’ wire. Open the bottom of the WX8 Controller by removing the bottom panel.
Take your ‘active’ wire and thread it under the terminal marked ‘M’ (you may need to loosen the screw beforehand). On some other brands of controllers this terminal may be label as P or P/S. Hand tighten with a screwdriver to secure the wire.


4. Connecting the Common Wire
Now take the other wire on your Master Valve and connect it to a wire on your Solenoid Valve, secure by twisting the ends together, this is your ‘common’ wire. Then thread both wires under the terminal marked ‘C’. Secure by hand tightening with a screwdriver.
5. Connecting the right Zone
Take the remaining wire on the Solenoid Valve, this cable will determine which station (or zone) you want to designate to you Solenoid. For this video we chose station one. Thread the wire under the terminal marked ‘1’, if you wanted it to be station 2 you would thread the wire under terminal ‘2’, etc. Hand tighten with a screwdriver to secure.


4. Testing the Connection
To test that everything is working correctly, turn on the power to your controller. Turn the dial to Station One and then press START. The solenoids should both start to hum if they are connected correctly.


Hi can the transformer support two master valves simultaneously. I have a master valve for the rear garden and another for the front.
I am running a bore pump. Wanting to integrate the Holman Ezy One X (potentially the WIFI model) can you reccomend a 24v ac relay to use?
if i have 4 stations and 4 solenoids – do all 4 solenoid common cables have to be linked to the common cable on the master? i did this with a gel connector – is this okay?
Hi Migs, that is perfectly fine and how it should be done. So all good!
Hi, I have dc valves and controller which I am changing to a AC smart controller and valves. In connecting the controller to the valves (about 30 metres), if I bury the cable directly, what is the minimum depth required. Alternately I was thinking of running above ground along the fence (probably in pvc). Any restrictions on above ground that I need to be aware of? Any other thoughts?
Hi I am running an EzyOneX controller with 6 solenoids (stations 1-6) connected to mains water through a KRain master. I want to add 4 more solenoids in different part of the property fed from a series of tanks. Having only 2 available stations (7 & 8) left on the controller, as I read it, I can double up on 2 of the existing stations and connect the last 2 of my proposed additional 4. I understand that these ‘doubled up’ solenoids would have the same run time as their host solenoids. My intention is to control the pump for the proposed stations with a 240v/24v for each ‘tank fed’ station, using the ‘two solenoids per station’ rule. However I am stuck for pump control for the last 2 tank fed solenoids as they would be fed from a station which already has two solenoids. Yes I could buy another controller to run the tank feed but… Any suggestions?
Hi Graham,
Thank you for the question. As you’re installing a secondary pump in this scenario, you’ll need to install another controller.
Effectively a pump relay will be your 5th item (4 stations + pump) and needs its own place on the board. Hope that helps, sorry it’s not the answer you were looking for!
Hi, I just bought the WX8, I only have a Master, and stations 1,2,3. Do I need to complete the loop for the unused ones (like the old Dial Ezy), or not?
If so, do I just connect unused 4,5,6,7,8, or do I need to connect 3,4,5,6,7,8? thanks!
Thank you for the question, looping unused stations is only needed when connecting a pump to your irrigation system. When there is a master valve, no loop back is needed. Leave unused stations blank.
There is just one question I can’t find an answer to. How far away from the controller can I place a solenoid – i.e. what is the maximum length of the wires between the controller and a solenoid?
Hi Stephen,
When it comes to Solenoid wires, the rules are more driven by how large the wire needs to be to carry the current, as opposed to the length of the wires. When using long runs of cables (50m or more), be aware that voltage drop can play a significant role, especially when more than one coil is wired to a single station.
As a good rule of thumb select your cable as follows:
0–50m cable dia 0.5mm
50–100m cable dia 1.0 mm
100–200m cable dia 1.5mm
200–400m cable dia 2.0mm
When making connections in the field, only ever use gel filled or greased filled connectors. Most field failures occur due to poor connections. The better the connection here, and the better the waterproof seal the longer the system will perform without trouble.
Morning Team,
I recently purchased the WX-8 with EVIE sensor but found that that it was supplied with a power cord.
Is it possible to remove this power cord and connect it directly to the mains power.
Is the transformer built into the model?
My previous controller (Hunter X-Core 6) which has stopped working was connected directly to the mains using 2 yellow wires because the transformer was built into the model.
Can you also confirm that the model is suitable for outdoor use?
Hi Kishan,
You can absolutely hard wire the controller to the mains power. Please engage with a licensed electrician to undertake the job though.
Hi
my home electric system in 240v AC.
which AC power supply can be used for better performance valve
24VAC or 240VAC ?
Hi Yousuf, your home power is indeed 240V, and your solenoids in the ground are 24V, so the controller in between these must transform that mains power down to 24V so you do not blow up your whole retic system. This is why you have the transformer / controller in place. If you have a pump or bore, you may have a relay between this and the controller for the same reason. Retic is only used at 24V AC (some are 24V DC).
Our existing (dying) control is wired direct to a circuit on the distribution board, not via a power outlet. Can the mains lead be easily replaced for a similar connection (without just cutting off the plug) or does it had an outlet for the plug.
Hi Mike, if you have a controller that has been hardwired to the home, you will need an electrician to remove that mains power. If this is just plugged into a power socket, you can just swap the controller over.
Some irrigation controllers are the same size and the internals can be swapped over without having to replace the whole controller especially if it is indeed hard wired. Please speak with your local irrigation store in regards to this, or you can call our customer support on 1300 716 188.
Hi, I just purchased and installed the WX8 Irrigation Controller. I have Hunter valves and they now make a loud buzzing noise when on with the Holman controller and don’t turn off on first go (have to turn on and off again to turn them off, essentially making the timers useless atm) using the app or controller manually. Are the Hunter solenoids compatible with the WX8 Irrigation Controller? The solenoids were previously working but with a Hunter controller. Thanks, Damian
Hi Damian, thanks for your question. Your WX8 should definitely be compatible with your current setup. If you can please submit a ticket or email our customer service team at support@holmanindustries.com.au they will be able to troubleshoot and help you correct your system.
Can you set the timer as low as 15 seconds 10 seconds
Hi Brad,
Thanks for your question. Run times for the WX8 start at 1 minute, so you are only able to set a run time using minutes and hours. Alternatively, our WX1 Tap Timer has a ‘Misting’ schedule, which allows you to set durations by seconds. You can check it out here: https://www.holmanindustries.com.au/product/wx1-tap-timer-and-wifi-hub/ Thanks, Dayna.
G’day, I’m looking to use one of your WX8 WiFi controllers on my parents property but three of the solenoids I’m planning to use will be off a different water line at the bottom of the property. Would it be possible/recommended to run two master solenoids (one on each line) off of the single controller?
Hi Cameron,
You should be able to connect an additional master valve to the controller. This would make both master valves come on at the same time though. Another option would be to use three master valves for the stations at the bottom of the property which might be a better solution for what you have there.
Do you manufacture a 20mm master solenoid valve? If not, then is is better to have a standard 20mm solenoid valve or just leave it out?
Hi Ross, we always recommend using a master valve when installing. We don’t have a master valve available, however, we can recommend the K Rain Master Valve. They’re available at Bunnings Warehouse. You can use adaptors to go up to 25mm to install, then back to 20mm to correct size to the pipe being used. Please let us know if you have any further questions. Thank you!
https://www.k-rain.com.au/product/pro-series-100-valve-25mm/
Is the wx8 powered by 240v or just by the 9v battery
Hi Peter, the WX8 runs off a 240V 50/60Hz single phase outlet, drawing 30VA at 240V AC. The battery is there as a backup to remember your settings in case of a power outage. Thanks!
Hi, i got EasyOne mini 6 station controller installed and working well. Somehow one of the zone stops working. I checked controller’s output is 12V and solenoid end also 12V, seems no breakpoint of the wire? but solenoid needs 24V to get working, correct? I also reconnected the wire to other working zones at the controller, but still shows 12V and the solenoid is not working, could you please advise possible problems, thanks
Hi Terry, the controller voltage should be 24v AC.Can you please double check the test was done on a AC and not DC? Thank you!
I have the WX8 worried up with all 8 stations and working great.
I have the EVIE sensor and a hard wired sensor installed and all works fine.
7 STATIONS are out in the open garden. 1 STATION is for the greenhouse.
So when rain sensor(s) are wet how do I get the greenhouse to be watered and ignore the rain sensor status. I know I can manually override but I bought the Holman for full auto operation.
Couldn’t find any helpful articles.
Thanks in advance.
Hi Edward,
Thank you for the comment! It is possible to set up a station to ignore the EVIE rain sensor status through Holman Home smart automations.
Step 1:
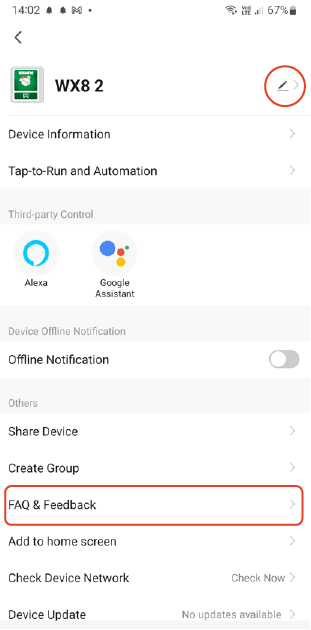

On your phone, navigate to the Holman Home page, tap on the WX8, then select the pencil icon in the top right-hand side of the page. You’ll end up in the WX8 Device Settings section.
Step 2:
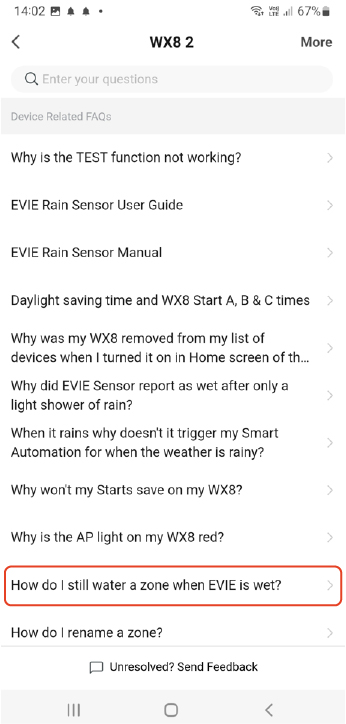

Tap FAQ and Feedback and you’ll see the Device Related FAQs screen below. Next, tap “How do I still water a zone when EVIE is wet?”
Step 3:
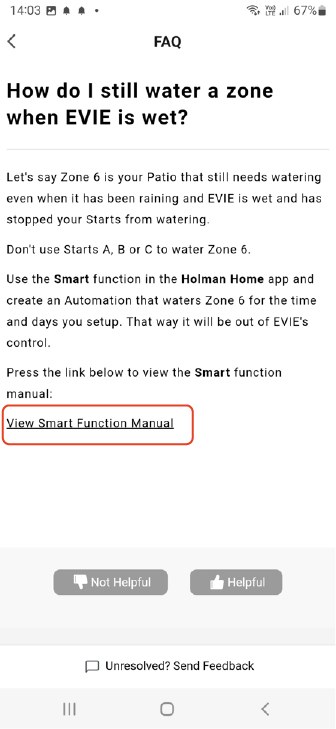

This will bring you to the FAQ article page. Tap “View Smart Function Manual”:
Step 4:
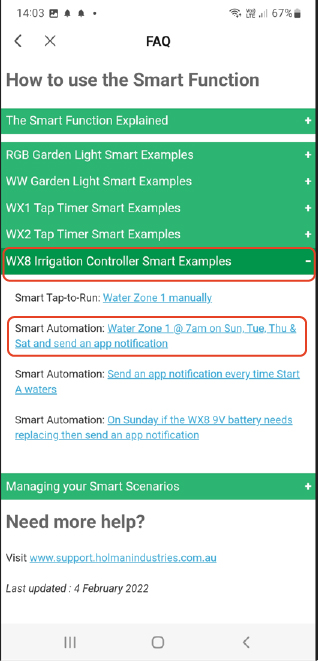

This will bring you to ‘How to use the Smart Function’. Tap WX8 irrigation controller smart examples. From the drop-down menu, tap “Smart Automation: Water Zone 1 @ 7am on Sun, Tue, Thu & Sat and send an app notification”
Step 5:
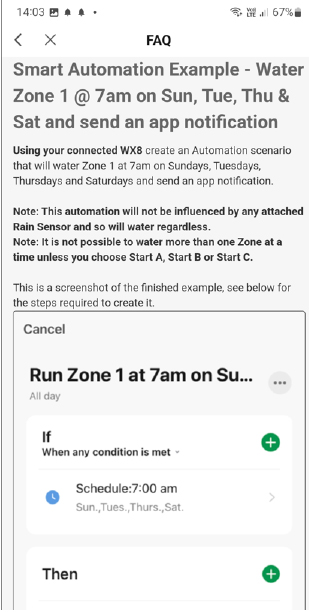

Tap “Smart Automation: Water Zone 1 @ 7am on Sun, Tue, Thu & Sat and send an app notification” and follow the instructions while programming your controller to the correct settings that suit you.
Please feel free to reach out to our friendly customer service team with any further questions about programming controllers at support@holmanindustries.com.au. Thanks again!
Hi, I am going to buy solenoid valve and rain bird controller. can any one answer to my questions.1- the solenoid valve i am going to purchase would be operate with AC or DC power?2-what is the maximum distance between controller and solenoid valve to operate?
Hi Rahimullah, 99% of ‘retail’ controllers will be 24v AC – a very small amount will be DC or 12V. The distance depends on the size of the cable, normal cable (sold via BBS) will have a range of 80-100M. We do not sell Rainbird Controllers, however, we do have a new Wi-Fi enabled controller if you’re interested? 🙂 https://www.holmanindustries.com.au/product/wx8-wifi-irrigation-controller/
Hope this helps!
How do I join the solenoid cable to a 20mm micro valve. The size of wire is very small compared to the valve or is a different wire I should be using
Greg
Hi Greg, joining the 20mm micro valve should be the same as any other valve – you can use wire connector or gel connectors or even use insulation tape. Please let us know if you have any further questions!
https://www.bunnings.com.au/holman-wire-cable-irrigation-connectors-10-pack_p3119565
https://www.bunnings.com.au/k-rain-idc-gel-cable-connectors-5-pack_p0242399
hi. I have installed three manifolds with Holman solenoid valves. One controller is a power rainbird and another is a 9V DC rainbird, both work fine. However I have installed a Toro 9V DC controller which is communicating with the solenoid but is not opening it. I hear a click and a thud but no water flows. I have tried a 9V battery across the solenoid wires and the manual control which both works fine. Any ideas on a troubleshooting? thanks in advance.
Hi Mark, you’ll hear a click with a battery but it’s not powerful enough to open to the solenoid coil. A 9-volt system is a DC system, all of the Holman solenoid valves are AC (24volts). You’ll need to swap the coils to a 9volt DC coil. Please let us know if you have any further questions. Thank you!
Free
A solenoid valve has two wires, which one connects the common end of the Holman controller? Maybe it doesn’t matter?Whichever can connect the C end?
Hi Adam, you can connect either cable to the Common on the terminal block and the other one is used for the Active Station. Which cable you chose to connect from the solenoid does not make a difference. Please let me know if we can help further.
Can i use a normal solenoid valve as the master valve
Hi Robert, technically speaking you can, but we do not recommend it. It’s more beneficial to use a mater valve, like the K Rain 25mm Solenoid Valve. It is WaterMark Approved and has an angled body for better flow. I have included a link below if you would like to check it out. Thank you.
https://www.k-rain.com.au/product/pro-series-100-valve-25mm/
This is an explosive idea; this is most probably the best and most successful thing about how to wire a solenoid valve to an irrigation controller. I love this blog and really happy to come across this exceptionally well written content. Thanks for sharing!!
Hello, thank you for the feedback! We’re glad it could help. Thanks, Your Holman Team.
I have 3 solenoids connected to 3 different stations and for some reason they all come on at the same time. All stations are set for different times. I have checked all wiring to ur fittment guide. They are Holman solenoids also
Hi Luke, thank you for reaching out. Are you using a WX8 Irrigation Controller? Check the wiring between the Irrigation Controller and your solenoid valves, as there may be a fault. If this doesn’t solve the problem, please contact our customer service team on support@holmanindustries.com.au. They will be able to walk through some troubleshooting with you, thank you.
Hi, is it possible to run a solenoid just with a 24v power supply and a power point timer? If so what output should my 24v supply be to run the solenoid successfully
Hi Nick, yes possible but not recommended as it won’t be fused. The power supply should be around 1000mAmps.Thanks!
Hi there
Do you have to run a master valve?
Hi Jason,
there is no need to run a master valve if you use reliable solenoid valves. We do encourage to use a master valve though where possible. The controller and irrigation will run without.