
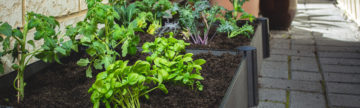
Project: Irrigating Courtyard Pots
Updated Tuesday 7 November 2023 – Steps 6 & 7
Micro Irrigation systems are ideal for minimising water wastage and ensuring your plants are getting the exact amount of water they need.
Drip irrigation is simple and cost effective to install and guaranteed to save you plenty of time and energy hand watering your plants!
We set up our own automated drip irrigation system in no time by following the steps below. You can turn water on manually, or set it up with a WX1 Wi-Fi Tap Timer to create a self-watering system for your potted plants. We used the Holman WX1 Tap Timer which allowed us to pre-program our ideal watering schedule using a smartphone. Please note the WX1 Tap Timer requires a Wi-Fi Hub to operate, available packaged as the WX1 Tap Timer and Wi-Fi Hub. However a single Wi-Fi Hub can connect up to 4 x WX1 Tap Timers.
Please note this video includes the discontinued BTX1 Smart Valve. We recommend using the WXT1 Wi-Fi Tap Timer in it’s place.
Shopping List
- PPH1325 13mm × 25m Poly Pipe
- PFH410 4mm × 10m Flex Tube
- 102650 13mm Barbed Elbows
- KRC13 13mm Ratchet Clamps
- MPJ4TBE 4mm Barbed Joiner
- KP13 13mm End Plug
- 102652 3mm Pressure Reducer and Filter
- KRST360 K‑Rain® Adjustable Trickler
- HA5410 Hold Down Stakes (10pk)
- 102648 5mm Poly Hose Punch
- 31685P PC Shrubbler Barbed Dripper (10pk)
- 6511H Grip ‘n’ Lock™ Hose Connector
- 3712H 2‑way Brass Manifold
Step 1
Count out the number of pots you’re needing to irrigate, noting how far apart they are. This will determine the number of drippers needed and the length 13mm Black Poly Irrigation Tube required for the project.

Step 2
Measure the length of 13mm Black Poly Irrigation Tube needed from your tap to the last pot. Be sure to include enough pipe to clear corners or steps in the area you’re irrigating. To get around any corners, simply cut the poly, and connect each side to a 13mm Barbed Elbow. To prevent future leaks or drips, connect 13mm Ratchet Clamps on either side of the elbow. These are used to attach micro fittings to the mainline poly pipe to prevent leakage.
Tip: Roll your 13mm Black Poly Irrigation Tube out in the sun and leave it to soften for 20-30 minutes. This makes it much easier to work with. If your poly runs through any garden beds, you can use Universal Hold Down Stakes to hold everything in place.
Step 3
Starting from the last pot, attach a 13mm End Plug onto the side of poly pipe furthest from the tap and secure it with a 13mm Ratchet Clamp.

Step 4
Neatly line the pipe behind the pots. Once hidden, measure the length of 4mm Irrigation Flex Tube required to take water from your mainline poly to each plant. To connect the drip lines, punch a hole in the mainline 13mm Black Poly Irrigation Tube (using the 5mm Poly Universal Hose Punch) where you want to add each dripper. Using 4mm Barb Joiners, attach the flex tube to the main line poly and your preferred dripper head.
Tip: Measure out some extra 4mm Irrigation Flex Tube so you’ve got enough to move around or change the pots in future.
Step 5
Connect your choice of K-Rain® Adjustable Trickler or PC Barbed Emitter. We used a combination of tricklers on spikes and dripping emitters. Centre the micro heads in each of your pots to one side of the plant or the base. Be careful not to damage any roots or seedlings when your pushing the irrigation spikes into the soil.
Step 6
Connect an Automatic Tap Timer to your garden tap. We used a WX1 Wi-Fi Tap Timer so we could pre-schedule everything from a smartphone. For more information about setting up your Wi-Fi Tap Timer click here.
Tip: Use a 2‑Way Brass Manifold to convert your garden tap into two independently operated outlets. This gives you a spare tap to use for manual hand watering or to hook up a separate irrigation system down the track.
Alternately you could use a WX2 Wi-Fi Dual Outlet Tap Timer to set up two separate automated zones. This will allow you to water different types of plants without over or under watering. Please note that this Dual Outlet Tap Timer is only available with the Wi-Fi hub included.
Step 7
Connect your poly to the WX1 Wi-Fi Tap Timer (or straight onto your garden tap) using our Grip ‘n’ Lock™ Hose Connector; guaranteed no leaks or drips when connected to a hose or poly pipe!
Tip: We recommend attaching a 13mm Pressure Reducer to increase the efficiency of your drip system. As the name suggests, pressure reducers are designed to minimise water pressure before filtering it through the system.


I’m wondering if the https://www.bunnings.com.au/holman-13mm-pressure-reducer-and-filter-assembly_p3120097 is adjustable ?
Can I adjust the flow reduction? If not, what would be the best to reduce pressure inline ?
I have a new garden that has regular plants and succulents mixed together. I am unable to put them on separate lines due driveway access but I have the previous owners 13mm irrigation pipe under the drive and would like to run a 4mm drip line off a 13 mm drip line so that the amount delivered in sections is less to the succulents please? Is this possible please?
Hi Joan, It is not recommended to run dripper line and garden sprayers from the same line. You will need 2 separate lines to run the 2 different types of watering for these plants.
One line to water regular plants with spray or micro sprayer irrigation. This section will only need up to 20mins watering max ( dependent on soil type).
Dripline delivers less water in less time so it must be run for a min of 45mins to allow the benefit of direct watering for the plants.
Hi. How do I connect 4mm micro tube to 13mm flex poly. My connections leak. I have used barb and threaded connections.thank in advance.
Hi Nenad, usually 4mm micro tube is connected to regular poly pipe as this is more rigid than flex poly. We suggest just using barbed fittings with your flex poly as these will make for a better connection and should stop leaking when under pressure.
1. What size hose fittings and pressure reducers and anything else will I Need to go between my WX1 Timer and the 13mm poly? 2. Will i need 4mm flex if I use shrubbier on a spike but not with shrubbier barbed dripper? 3. Anything else I’ll need to run irrigation up alongside pathways for edging plants?
Thanks
Sean
Hi Sean, thanks for your questions. 1. We recommend using our Pressure Reducer with filter, it will connect to the bottom of your WX1 Tap Timer. It also comes with a 13mm barbed end, this can be joined to the start of your 13mm poly and secured with a ratchet clamp. 2. Yes you will need to use 4mm flex to connect the Shrubbler to your 13mm main line poly. 3. To keep your poly in place, we recommend securing it down using Hold Down stakes, place 1 per metre of poly pipe. Hope this helps!
Huge help. thank you. Re Pressure reducer. That one takes me to https://www.bunnings.com.au/holman-19mm-regular-irrigation-filter_p3110237 Does it matter whether I get this or or https://www.bunnings.com.au/holman-13mm-pressure-reducer-and-filter-assembly_p3120097 ?
Also, will I need 1 of these for every Shrubbier where the 13mm poly pipe joins the 4mm flex? Holman 4mm Micro Poly Irrigiation Barb Joiner – 20 Pack
Hi Allan,
Can i use ezi flex 13mm in place of 13mm pvc pipe?
Thank you
Hi Dimpy,
that depends a little on your application. The advantage of poly pipe is that you can punch into the pipe and branch off 4mm poly tube.
Just wondering if I can use the flex tube with barbed joiners in an air line that I’m running for my pond. Thanks
Hi Jamie, it should be ok to use as an air line. Please make sure the flex tube is cut straight with a sharp blade and the fittings are push in all the way. Thank you!
Can I use barbed OR threaded sprays in 13mm poly pipe or is one better than the other? Also the same question in riser or flex tube.
Hi Mike, we suggest you use a threaded riser and a threaded jet in your 13mm poly pipe. Alternatively you can use a barbed joiner with flextube and use a barbed spray on the flextube. So basically threaded on rigid tube and barbed on flextube.
Hello, What is the difference between a K-Rain adjustable Trickler and a dripping shrubbler?
Hi Sin, there isn’t a lot of difference other than the spray pattern. The Vortex Spray Shrubbler is more of a fan spray and the Trickler is a finger spray. Thanks! Your Holman Team.
Could you tell me where I can buy a micro irrigation kit ???
Hi Allan,
Our micro irrigation products are available at your nearest hardware store. Unfortunatley we don’t currently have any pre-collected kits on range at the moment.
Cheers,
Nathan